
Check out the before and after shot for my Sunday project: a dress up wardrobe for the girls!
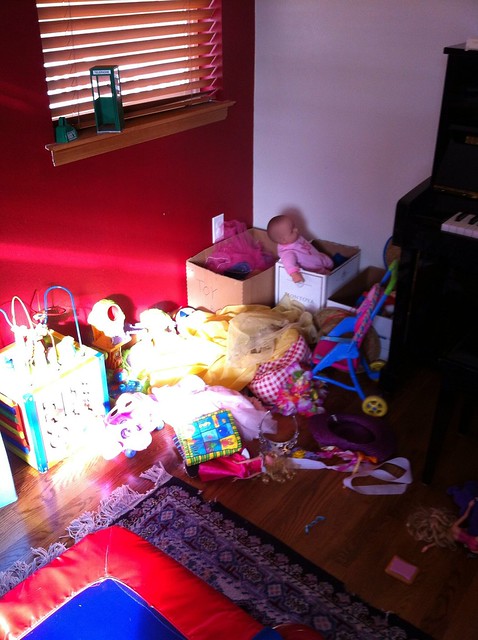

I decided that we needed a new strategy for organizing dress up clothes since the toss-everything-in-the-box concept was a failure. I spotted this project on Pinterest and in my sleep-deprived mother-of-three-kids-four-and-under kind of way, I decided, “Hey, I could do that.”
So I took a list of wood cuts I needed over to The Home Depot and stared blankly at cuts of pine until a store employee came over to help me. I often find there are two ways to get good service at Home Depot. #1. Be female and attractive. #2. Bring a herd of small children with you. I left the kids at home this time around. The best part about Home Depot is that they’ll cut the wood for you if you ask them to. It’s less I have to do and I’m pretty lazy.
Here I am with my wood and my drill:
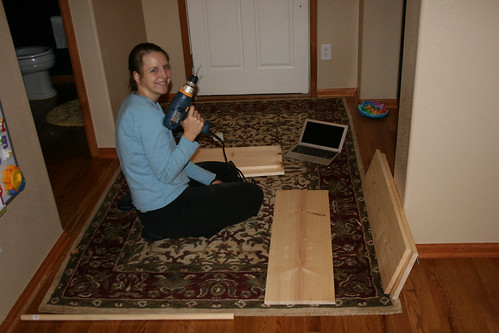
I pre-drilled some holes for my screws and got down to it. Beginner’s tip here: Be sure that you measure where your holes are going because it’s a pain in the ass when they don’t line up well. This project is ideal for beginners because building a box is extremely easy and you get good results quickly. I went from slabs of wood to a wardrobe in an hour and 45 minutes, including a time out to breast feed #3 and put her down for a nap. Brendan also assisted by printing out an arch for me to trace onto the side cuts so I could jigsaw two relatively even arches.
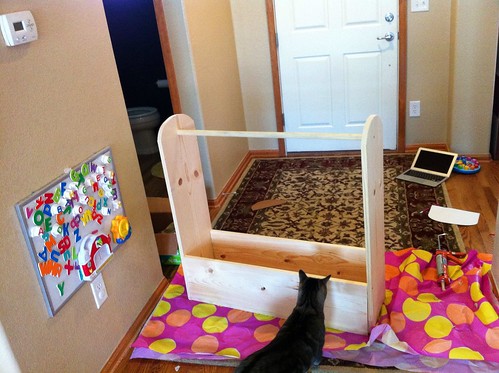
Here it is:
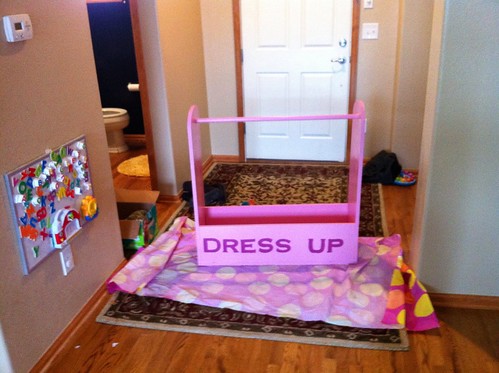
Of course, I live in a world of little girls and we’re pretty fond of our pink over here.

So, a few beginner tips for painting. Paint from the top to the bottom because as Michaelangelo said, “That shit doth drip.” And use two coats. I picked up a quart of Behr semi gloss paint and primer combo in Disney’s Princess Power pink (DC2C-40-3).
Of course, no giant pink wardrobe would be complete without letters. I have the artistic skills of a two-year-old but I printed out some giant letters from my computer; that’s copperplate font. I cut those out and traced them with a Crayola washable marker and then painted them in Disney Enchanted Coach Ride pink (DC2C-40-4), which I bought in a sample size. If you didn’t paint over the marker lines, they’ll wash right off.
Done!
Cost: About $45. You could go cheaper on the paint, but I wouldn’t.
What’s the pain in the ass factor here? It really depends on how much you like to paint. Building the box is easy so long as you have the most rudimentary understanding of how to use a drill and a saw (and trust me, you can gain that understanding in about two minutes). The painting is easy but it does take a bit of time. It was 55 degrees here today so I put the wardrobe on an old shower curtain and painted it on the front porch. To me, it’s pretty relaxing but I could see how someone else could find it a bit tedious. The block lettering is irksome, but for minor irritation, you get a beautiful result so I think it’s worth it.
Fun, easy and utilitarian!